Rugby union features 15 players divided into 8 forwards and 7 backs, each with specialized roles that create team strategy. Understanding these positions is essential for appreciating how the game flows and why certain tactics succeed. For those new to the sport, rugby rules provide the foundation for understanding gameplay.
- Rugby union has 15 players: 8 forwards (#1-8) and 7 backs (#9-15)
- Forwards dominate set pieces (scrums, lineouts, mauls) while backs handle attack and counter-attacks
- Each position has unique strategic responsibilities beyond basic roles
- Understanding positions enhances game appreciation and tactical analysis
Rugby Union Positions: The Complete 15-Player Breakdown

Rugby union’s 15-player structure creates the foundation for team strategy. The game divides into two distinct units: forwards who control possession through physical contests, and backs who create scoring opportunities through speed and skill. Effective rugby tactics leverage these positional strengths to create winning strategies.
The Forward Pack: 8 Players Who Control Possession
The forward pack forms rugby’s physical core, dominating set pieces and winning the ball through scrums, lineouts, and rucks.
- Loosehead Prop: Scrum stability with left bind, lineout lifting, powerful carries, tackles. Anchors scrum angle and provides forward momentum.
- Hooker: Hooks ball in scrum, throws lineouts with precision, supports in rucks. Acts as breakdown jackal and set piece specialist.
- Tighthead Prop: Scrum powerhouse with right bind resisting pressure, carries ball, leads mauls. Provides “pillar” strength under torque.
- & Locks: Lineout jumpers (6’10″+ height advantage), scrum drive, maul leaders, tacklers. Aerial dominance in both attack and defense.
- Blindside Flanker: Lineout option, ruck poacher, defensive workhorse on tight side. Power on narrow side creates forward momentum.
- Openside Flanker: Breakdown thief specializing in jackaling, high tackle count, speed. Turnover specialist who changes game momentum.
- Number 8: Scrum base who picks/holds ball, makes big carries linking to backs. Forward playmaker who connects forward-back play.
The Back Line: 7 Players Who Drive Attack
The back line handles rugby’s attacking phases, using speed, passing, and kicking to create scoring opportunities.
- Scrum-half: Links forwards and backs, quick passes from rucks and scrums, box kicks, organizes play. Tempo controller who dictates game pace.
- Fly-half: Playmaker who kicks, passes, and runs, directs overall strategy. Tactical brain making on-field decisions.
- & Wingers: Speed finishers, kick chasers, wide defenders. Try scorers on edges who capitalize on space.
- Inside Centre: Gain-line breaker, defends midfield, second distributor. Collision winner who wins physical battles.
- Outside Centre: Line breaker, gap defender, offloads ball. Elusive runner who creates attacking opportunities.
- Fullback: High-ball catcher, counter-attacker, last defender. Versatile sweeper who provides safety net.
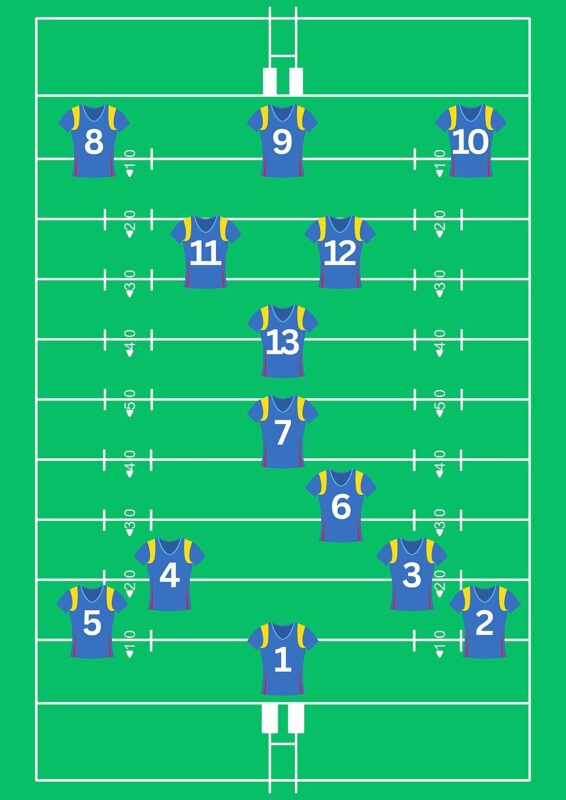
Position Numbers: The 1-15 System Explained
Rugby’s jersey numbering system helps identify positions instantly. Forwards wear numbers 1-8, reflecting their scrum formation where props are 1 and 3, hooker is 2, locks are 4 and 5, flankers are 6 and 7, and number 8 is 8. Backs wear 9-15, with scrum-half as 9, fly-half as 10, centres as 12 and 13, wingers as 11 and 14, and fullback as 15. This system originated from scrum formation and has become universal across rugby union.
Forward Positions: Set Pieces & Physical Dominance

Forwards control rugby’s physical contests, winning possession through scrums, lineouts, and rucks. Their size and strength create the platform for backline attacks.
Props ( & #3): The Scrums’ Foundation
Props form the scrum’s foundation, providing stability and power. The loosehead prop (number 1) binds on the left side, allowing some movement to absorb pressure. The tighthead prop (number 3) binds on the right, creating a more rigid platform that resists opposing pressure. Both props lift in lineouts, carry the ball in open play, and make crucial tackles. Their primary role is scrum stability – the loosehead anchors the scrum’s angle while the tighthead provides the pillar strength that prevents collapse.
Hooker (#2): The Lineout Specialist
The hooker’s unique role centers on hooking the ball back in scrums using their feet, requiring precise timing and technique. They also throw the ball into lineouts, where accuracy is critical – a bad throw can cost possession immediately. In open play, hookers support rucks and often act as breakdown specialists, known as “jackaling” to win turnovers. Their specialist skills in set pieces make them crucial for maintaining possession and creating attacking opportunities.
Locks ( & #5): The Aerial Dominators
Locks provide height and jumping ability in lineouts, often reaching 6’10” or taller. They drive the scrum forward, lead mauls as they’re lifted, and make numerous tackles in defense. Their aerial dominance extends to both attacking lineouts where they win possession, and defensive situations where they compete for high balls. Locks’ combination of height, strength, and jumping technique makes them essential for winning the physical contests that decide possession.
Flankers ( & #7): The Breakdown Specialists
Flankers specialize in the breakdown, the contest for possession after tackles. The blindside flanker (number 6) provides power on the narrow side of scrums and rucks, acting as a defensive workhorse. The openside flanker (number 7) focuses on speed and turnover ability, specializing in jackaling to win possession illegally but effectively. Opensides typically have the highest tackle counts and are crucial for creating turnovers that shift momentum. Their breakdown work often determines which team controls possession and tempo.
Number 8 (#8): The Forward Playmaker
The number 8 sits at the back of the scrum, able to pick up the ball and carry it forward or pass to scrum-half. They make powerful carries that link forward play to backline attacks, acting as a forward playmaker. Number 8s also provide leadership in the forward pack, organizing scrums and lineouts while making crucial decisions about when to drive forward or release the ball. Their ability to read the game and make quick decisions connects the physical forward play with the tactical backline.
Back Positions: Attack & Counter-Attack Specialists

Backs handle rugby’s attacking phases, using speed, passing, and kicking to create scoring opportunities. Their agility and skill complement the forward pack’s physical dominance.
Scrum-half (#9): The Tempo Controller
The scrum-half links forwards and backs, receiving the ball from scrums and rucks to distribute to fly-half or other backs. They make quick, accurate passes that maintain attacking momentum and organize the backline’s structure. Scrum-halves also execute box kicks – tactical kicks from behind the scrum to gain territory or pressure opponents. Their ability to control game tempo through quick ball distribution or strategic kicking makes them crucial for maintaining attacking rhythm.
Fly-half (#10): The Tactical Brain
The fly-half acts as rugby’s on-field strategist, making decisions about when to kick for territory, pass to runners, or run themselves. They direct the backline’s attacking shape and defensive organization, often calling plays and adjusting tactics based on game situations. Fly-halves must read defensive alignments, identify weaknesses, and execute tactical kicking strategies that balance territory gain with pressure application. Their playmaking ability and decision-making skills make them the team’s tactical brain.
Centres ( & #13): The Collision Winners
Centres win the physical battles in midfield, breaking through defensive lines to create attacking opportunities. The inside centre (number 12) focuses on power and gain-line success, breaking tackles and providing second distribution options. The outside centre (number 13) emphasizes elusiveness and line-breaking ability, using speed and footwork to create gaps. Both centres must defend against midfield attacks, tackle effectively, and support wingers in both attack and defense. Their ability to win collisions creates space for backline attacks.
Wingers ( & #14): The Try Scorers
Wingers provide speed on the edges, finishing attacking moves by scoring tries. They chase kicks to regain possession, defend wide channels against opposition attacks, and use their pace to exploit space created by inside backs. Wingers must have excellent finishing ability, catching skills for high balls, and defensive awareness to cover their channels. Their primary role as try scorers makes them crucial for converting backline opportunities into points.
Fullback (#15): The Last Line of Defense
The fullback acts as rugby’s safety net, catching high balls from opposition kicks and initiating counter-attacks. They provide the last line of defense against breaks, tackle when others are beaten, and use their vision to launch attacking plays from deep positions. Fullbacks must be versatile, comfortable under high balls, able to kick effectively, and capable of making breaks when opportunities arise. Their ability to read the game and provide cover defense makes them essential for team security.
Understanding rugby positions reveals how specialized skills complement each other to create team success. Rather than just size differences, each position requires unique abilities that contribute to overall strategy. Next time you watch rugby, focus on one position’s role throughout the match to see how their specialized duties impact the game’s flow. Proper rugby training develops these position-specific skills.
Bangkok International Rugby Tens showcases these positional roles in a fast-paced 10s format where understanding player responsibilities becomes even more critical due to the game’s quicker tempo and smaller team size. Players need proper rugby equipment to perform at their best in this demanding format.